Playing games on a computer via keyboard and mouse is a different thing and playing it via a controller is a totally different experience. With controller, you get the real-time gaming experience. Although there is various controller present in the market here we will talk about one of the most famous controllers; Xbox one. But How To Connect Xbox One Controller To PC? We’ll let you know about the various ways to connect it your Windows PC. First of all, we’ll begin with Windows 10 and then later we’ll go on Windows 8.1 and Windows 7.
Windows 10 PC
Option 1: USB
This method needs no details, all you’ve to do is plug one end of your USB into the front of your controller and the other end into your PC.
Option 2: Xbox Wireless (Built-in or with Xbox Wireless Adapter for Windows)
- Go to Settings -> Devices on your PC.
- Select Add Bluetooth or other devices.
- Choose Everything else.
- Select the Xbox wireless controller.
- Now click on
To connect wirelessly, you just need to follow these simple steps to connect your controller with your PC. You can connect up to 8 wireless controllers at a time into your PC. If the controllers have Xbox chat headsets attached then 4 or if they have Xbox stereo headsets, two of them can be connected at a time. Before doing this make sure that you’ve Xbox wireless adaptor in your PC because that’s not available in all markets. Also if you want to play while being on the aeroplane mode, just enable the Xbox accessory radio which will be turned off by default in Airplane mode.
Option 3: Bluetooth
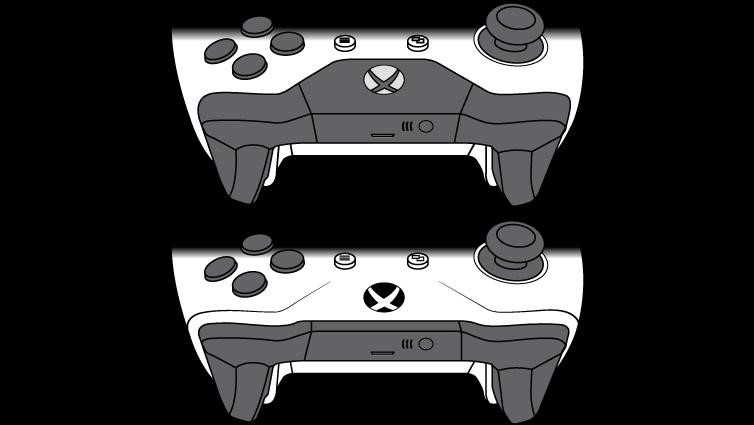
Xbox One wireless controller may or may not support Bluetooth feature for connecting itself to your PC. To know about whether your controller supports Bluetooth or not, look at the picture given below. Your controller supports Bluetooth if the plastic around the Xbox button lies on the face of the controller. Otherwise, if the plastic around the Xbox button is present on the top where the bumpers are, then your controller does not support the Bluetooth feature.

Now let us see about how you’ll pair your controller to your PC via Bluetooth. But before we begin, please make sure of these things;
- Your PC should be running a Windows 10 Anniversary Update.
- For optimum performance, do update your controller.
- Bluetooth feature is only supported by PC, Laptops and tablets and it also does not connect any other attachments like headsets, chatpads, etc.
Steps to pair your controller to your PC via Bluetooth
- Turn on your controller by pressing the Xbox button.
- Now press the controller connect button for 3 seconds and then release.
- Now go to Settings -> Devices -> Bluetooth and other devices.
- Do turn on Bluetooth on your PC so that it can find your controller.
- Select Xbox Wireless Controller – > Pair.
Windows 8.1 and Windows 7 PC
The methods discussed till now were specific for Windows 10 PC, but now we will discuss how to connect your controller to Windows 8.1 or Windows 7 PC. Here you can easily connect your controller to your PC via a micro USB. As soon as the micro USB is plugged in your PC, Windows will automatically download and install the drivers for your controller. Although if you’ve disabled the Windows’ automatically download feature, then you’ll have to enable it again. You can do it by checking for updates through the device manager. Let us guide you about how to do it.
- Go to the lower right corner of your desktop screen and click on
- Enter Device Manager in the search box, and then click on Device Manager.
- Now just find Microsoft Xbox, one controller, click on it to expand.
- Right click on the expanded Xbox one controller and click on Update Driver Software.
- Select Search Automatically for Updated Software.
You can connect at most 4 Xbox one controller at a time either through a USB or wirelessly. In windows 8 or Windows 7.1, the Bluetooth feature is not supported.
So this was all about how can you easily connect your Xbox One controller to your Windows PC. Try it out and let us know if we were helpful. Do not forget to share, comment and subscribe.


Incredible article, thanks yourself techiblipib!
Thanks Ali, but I don’t think my name is Techiblipib. LOL.